In the Beginning…
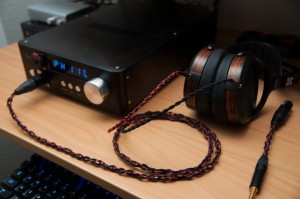
Starting a Do-It-Yourself project is in many ways like staring at the blank page of a new Word document. You have an idea of the end product (an essay or article or an amplifier or cable), a vague idea of how to get there (write and revise, solder and test), but no idea of how to actually start.
One day I got it into my head that I needed a balanced headphone cable and amplifier. I enjoy a nice open soundstage and the LCD-2f just wasn’t giving me that. I’d heard that going balanced opens up the soundstage and so that was the next logical step since I was otherwise happy with the LCD-2f.
By the time I actually purchased a balanced headphone amplifier and was ready to take the plunge, I’d sold off the LCD-2f to try the HE-560. But I still felt the burning curiosity on how much balanced really affects sound.
Has the following scenario ever happened to you? You decide to buy something relatively standard like a shelving unit or a headphone cable. You head out to the store or website to buy one, find something that looks nice, and then you see the price. Your body shuts down for a second as your brain devotes 100% of its resources to trying to understand how such a thing could be possible. Your wife is talking to you, snapping her fingers in front of your face, but your brain is otherwise occupied.
How does $35 in parts turn into a $600 shelf?!” you ask yourself. “I could make that in my garage for a fraction of the cost! Oh wait… I don’t actually know how to do it though. And I don’t have the tools. And I’d rather just watch the game…”
Yes, I have that happen quite often and it happened to me when I started pricing balanced cables for my new rig. I have a business degree and I understand that sometimes it’s better to just pay someone to do it and save your precious free time for other activities. But sometimes none of that matters. Sometimes you just want a hobby.
I realized that I had a pretty sweet headphone rig after a year of slowly moving up the chain and educating my ears. What I needed now was a new hobby that would enable me to make use of my rig while doing the hobby. I realized that making my own cable would be a great way to do that and as a bonus I would end up with a better-sounding rig! With that decided, suddenly, I was looking at that proverbial blank Word doc. I knew what I wanted (a balanced cable for my HE-560) and I had a vague idea of how to get there (buy some connectors and wire and solder them together) but no idea of how to actually start.
Thus began my DIY journey.
Interlude
I will be writing a series of articles describing my personal DIY journey in the hopes that it will help you should you decide to start yours. I’ve completed three projects to date, two cables and one amplifier kit. I’m in the planning stages of my next project, which is to modify a vintage DAC. I have a few ideas of where to go after that, but I don’t want to get too far ahead of myself.
For now just know that I’m a relatively new to this hobby. I’ve made some typical mistakes as well as some face-palm mistakes that I am really embarrassed to admit too. Fear not! I’ll offer them all up here for your amusement and, hopefully, education.
Project 0 – The Prep Work
The biggest key to success that I have found so far in my limited experience to do the prep work and have a plan of action before starting . This may seem obvious to some of you but it’s something I had to learn. You see, I’m a tinkerer. I like to learn by doing.
I grew up a computer nerd. I upgraded my first PC from an 8088 to a 286 when I was just thirteen years old. I’d never done anything like it before, but my father had purchased the parts and provided the tools. His instructions? “Take everything out until you get to the motherboard, replace the motherboard, and then put everything back where you found it.” It took me all day but I did it and it worked!
My father got me started on the path and, as frequently happens, I surpassed his skill level in just a few years. I got there by just tinkering my way through things. I understood intuitively that I would mess up something now and again, and fixing it was going to be as much of a learning process as doing it right the first time. I think this attitude is very useful in DIY. You can’t be afraid to mess something up.
That said, these days we have something called the internet, with which you may be familiar. It’s the grand repository of all human knowledge and if you’re reading this you probably have a functional understanding of how to use it. With this knowledge, you can prepare yourself to go into any project without having to ever guess the right way to do something. That tinkering skill will come in handy at some point, for sure, but there’s no need to recreate the wheel anymore.
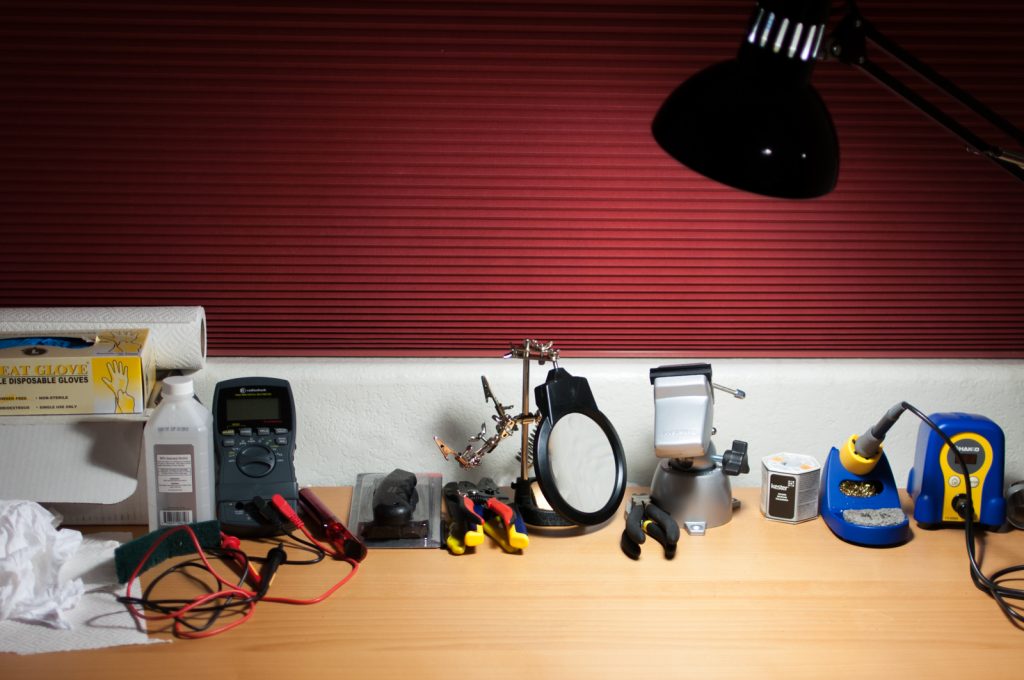
My workspace. Not shown is the heat gun on the right.
So the first step in the DIY journey is arming yourself with the proper tools. My personal style when working through the prep work is to open a spreadsheet and start listing what I need, where to get it and how much it costs. Everyone has their own style and I encourage you to use what works for you, but do be sure to use a system. The last thing you want is to be in the middle of a project and realize you’re missing an important tool and, oh it’s 1am and everything is closed and good luck getting it tonight!
Before I get to the list, I’m going to mention one more thing. Feel free to use whatever brand or variation on these tools you like. I’m providing the ones that I personally used because I know some people don’t have the patience or inclination to figure it out for themselves (and that’s totally fine!) You don’t have to take my word for it, though; use your internet skills and find the best specific tool for your needs.
The List
- Digital Soldering Station – This is one of the more important tools when trying to solder pieces of metal together. It heats up the pieces of metal and melts the solder so you can attach or detach bits as needed. The soldering station is basically a soldering iron with a handy dandy holder, a sponge, a tip cleaner and a digital temperature control. At my stage of development, I’ve never even adjusted the temperature once. However, I figured it was best to future proof myself a bit.The one I use, a Hakko FX-888, was recommended by a few folks as a solid option. So far, I’ve got no complaints. If you have your own soldering iron already, you’ll still want to pick up a holder, sponge and tip cleaner.
- Solder – Another really important part when soldering. This is the bit you melt with the soldering iron. There are plenty of variants and the main differences are the diameter of the solder wire, the lead content, and the flux content. Yes, complicated stuff that we don’t want to think too much about. So here, just get the Kester 0.031” 63/37 1lb spool. I’ve used this for everything so far with no issues.
- “Helping Hands” – One thing you’ll find when soldering is that you need more than two hands. I’m assuming most of you share my inability to produce a third or fourth hand at will, so you’ll want one of these gadgets. It’s basically a couple of alligator clips on some adjustable arms with a magnifying glass thrown in for inspecting the small stuff. Generally speaking, you really want to get one with a weighted base. This one here doesn’t have a weighted base, but that’s okay because of the next item on the list. (Note: I picked up a cheap one from Radio Shack during the bankruptcy sales. You’ll see that I snagged a few other things from there as well.)
- Panavise – You want a weighted base, you got it. What, you want even more weight? Screw it to your work bench! BAM! But really, you might not want to do that because it’s useful to move it around. Just buy the weighted base add-on.This thing is very useful for holding stuff that you want to keep stationary, for example something that you’re trying to heat to 750 degrees and pour molten lead onto. You can find it right here.
- Diagonal Cutters – There’s nothing better for cutting wire — and we’ll be doing a lot of that! I had my own already in my general tool kit, but if you don’t, here’s an example of one made by Stanley (“…like the power drill, OH!”).
- Wire Strippers – Now these come in many shapes and sizes. I spent way too long trying to decide which to buy, mainly because I used to strip a TON of wires when I was in tech and I know how handy a good wire stripper can be. For the DIY I’ve been doing, though, it’s been mostly really small 26AWG wires. So I picked up this one here, which will do 20-30 AWG and has a little lock, which is nice since these are basically really sharp scissors.
- Xacto Knife – For stripping some of the larger wires, it turns out that using a really sharp knife makes things go much quicker than a wire stripper. I picked up one of these at a 24-hour drug store because I didn’t order one ahead of time like I should have. Pretty much any will do but I kind of like the big grip on this one.
- Needle Nose Pliers – Remember when I was talking about heating things up to 750 degrees and molten lead and stuff? You probably want to keep your hands a few extra inches away if possible. That’s what these are for. Again, I already had a set. You probably do too.
- Tape Measure – Measure twice, cut once. I prefer the ones with both Metric and Imperial. I had several already, but if you don’t, try this one.
- Solder Pump – Sometimes instead of putting molten lead onto something, you want to take it off. There are two main ways to do this on a budget: solder braid or a solder pump. I picked the pump because it seemed nifty and less messy. I’ll probably end up getting braid also for my next project, but the pump has been sufficient for now. I grabbed one from Radio Shack, but this is basically the same thing.
- Shrink Wrap – These things are the secret to making your ugly DIY cables look pro. You place a little tube of plastic around something, heat it up, and it shrinks into a form-fitting, sexy little sheath. They come in many different diameters and even different shrinkage ratios. I picked up a variety pack (again at Radio Shack) because I had no idea what I needed.Honestly, I still have never bothered to measure the ones I use most to see what size they are because I have a lot left. For now, I say stick with what works. Grab something like this and you’ll be set for quite some time.
- Heat Gun – If you want that shrink wrap to shrink and subsequently wrap, you’ll need to apply heat. You could use a hair dryer in a pinch, but a heat gun made for this will work much better and quicker. My Radio Shack special works just fine. This is the same thing, pretty much.
- Digital Multi-meter (DMM) – This is one of those tools that you’re going to completely under-use at first, basically just testing continuity. But as you progress deeper into DIY, this will become much more important. I was (and still kind of am) really intimidated by all the choices out there. Fortunately, Radio Shack was going out of business and had one on sale for half price so I, being a sucker for a good deal, just grabbed it.I now know that an “auto ranging” DMM is less than optimal for some folks, since it takes a few seconds to dial in the range every time you take a measurement. If I did it again, I’d get one that’s a bit different. Maybe something like this one. It’s cheap, manual ranging, does all the basics, has good reviews, and cheap.
This list of tools will take you through a lot of your DIY adventures. You will eventually need more tools for more specialized jobs later (I now own a box of latex gloves!), but these are the basics.
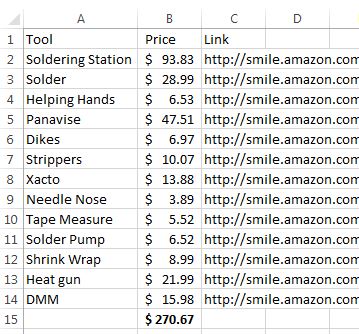
How much??
If you took my advice and made a list and priced everything out in a spreadsheet, you may be having that sticker shock moment right about now! Take your time, I’ll wait. Okay, $270.67 is the grand total on Amazon at the time of this writing and yes, that is a good chunk of change. I’d like to offer up two observations that saw me through this tough time in my journey:
First, the price above is an absolute worst-case scenario; you more than likely already have some of these tools sitting around the house. The great thing about tools is they’re generally useful in many scenarios that you didn’t anticipate when you first got them. You’ll be reusing tools you already have for a new purpose and you’ll be doing the same with these new tools eventually as well. The Panavise for instance, has already come in really handy on a non-electronics-related project that I did.
Second, the more DIY projects you do, the more you’ll save. Eventually the cost of these tools will be nothing compared to the money you’ll save. For example, the headphone cables I made were modeled after one that costs nearly $300 for 3 meters. I’ll show you how to make your own for about $30 in parts. Every cable you make will save you about $270, so the first cable pays for the tools and you’re saving nearly three bills for every cable after that. Not a bad investment, if you ask me!
Now, good reader, you are prepared to take on your first actual project: making a balanced headphone cable. In the next installment, I’ll go over the parts you’ll need and the process for putting the parts together. I’ll also link some resources that I used as reference when learning. It’ll be fun, and you will get a rad headphone cable out of it — it’s a win/win! I hope to see you then.




Reply
Reply
Reply
Reply
Reply
Reply
Reply
Reply
Reply
Want to join discussion?
Feel free to contribute!